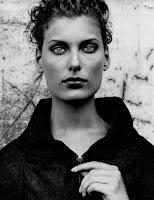
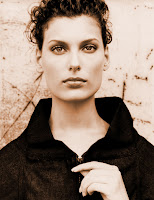
Wednesday, May 5

Final Project for Photoshop


I decided to do the extra credit project and make the following photo into the younger looking version shown above. I started off by using the clone stamp tool as well as the patch tool to even out her skin tones and reduce wrinkles. I then used the brush as an overlay and brightened the colors of her hair and skin. After, I used the magnetic lasso tool to create sharper lines around the woman and pull the image onto a new canvas. I then used the liquefy filter to try and smooth out the image. I then used the smart blur filter to add a finished touch to her face. I used the Smudge tool for the smoother hair. To finish I used an overall blur to smooth outthe entire peice and added the color to the background.

Friday, April 23

Retouch Project


I started off this Retouching project by using the clone stamp tool, patch tool, and spot healing brush to decrease the amount of visible wear and tear to the original copy allowing the image to be free of creases. I then went into the brush tool, lowered the opacity, and selected the overlay option. I then selected my colors and added them to their appropriate place. I would change my opacity and color depending on the effect I wanted in particular areas such as the background that is actually an overlay of both a light yellow and bright yellow-green. I then used the crop tool to create a new edge. By changing the canvas size under "Edit" I was able to also create a new white boarder finishing it's more polished look.

Thursday, March 25

Assignment 6- Take Pics

Panoramic Photo:

I began by going out side and taking seven pictures, unloading them to the computer. I then opened Photo shop and by using "photo merge" I was able to blend my seven photos together. I then used the crop tool to create clean edges. I then used the "lasso" tool to select areas of the new photo that looked a little awkward and played with saturation and color balance to smooth things out. I then used the blur tool to blur the edges where the individual images merged.

Wednesday, March 10

Assignment 5- Scanning

1. I scanned the woman from a magazine ad and used the magnetic lasso tool to take her out of the original ad. I then pasted in the jungle background as a replacement. I then used the text tool to create an ad for PETA.
2. For the second ad I decided to change the background again and go with an ad promoting travel to visit the Mayan temple and ruins of Central America so I put a temple in the background.

Friday, February 5

Assignment 3


1. Black and White
I started off by creating an adjustment layer under the "Black and White" tab. I then brought the blue down to -53 and the red to -111 to create a dark and spooky effect.


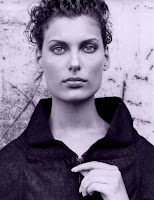
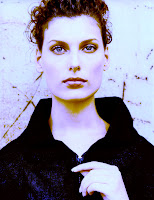
2. Black and White with Tint
I again brought up a Black and White adjustment layer. I brought the "yellow" down to a -9 and then added a tint. I changed the color of the tint to a pale lavender for a softer, entrancing look.


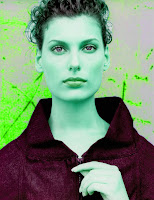
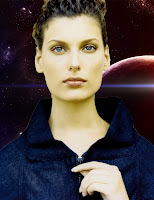
3. Model and Background- Different Colors
I used the Magnetic lasso tool to select the model and then used the eraser tool to refine the selection. I then, while the model is selected, created an adjustment layer for Hue/Saturation. I changed the hue to +116 which gave the model an outer-worldly cyan glow. I then inversed the selection to change the background. I changed the hue to +59 to get the lime green and also increased the lightness.


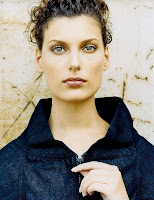
4. Gradient Blur- center sharp, edge blurred
To blur I just selected the Blur Tool, made the brush large, and hardness to only 4%. I continuously blurred the background and edges until the model really "popped".


5. Sharpening
Under "Filters" and then "Sharpen" I used the Smart Sharpen tool and raised it to %150


6. Old Looking Image
Started off by going into "Blur" under "Filter" and adding a Gaussian Blur. I then went back to "Filter" and "Add Noise" to about %40. I changed the blending mode under "Layers" to a "Soft Light". I went into "Hue/Saturation", clicked "Colorize", and then brought the hue up to a warm yellow-red and increased the saturation and lightness.


7. Change the Background
I began by using the Magnetic lasso tool to select the model, used the eraser to make it more refined, then inversed the selection. I then brought up by new background image in a new window and selected the whole background. I copied the selection and used "Fill" to fill the selection around the model. Finally I used the blur tool to try and soften the edges.
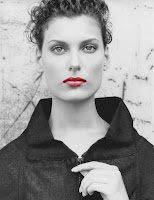


8. Choice
I selected the model's lips using the lasso tool and adding red-purple color to them by cutting out the selection, moving it to a different layer and then lowering the saturation on the original layer to -100 and the lightness up to +12. I then used the "Smudge" tool to soften the edges.


9. Choice
I went under the "Photo Filter" tab, added the "Underwater" filter, then raised the saturation. I then created a "Color Balance" layer, raised the levels of blue and magenta of the Highlights. Under shadows, I raised the levels of red and yellow to create a surreal effect.
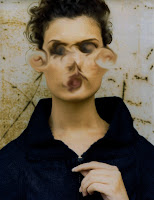


10. Choice
I used a size 25 "Smudge" brush to annihilate her face into a expressionism's cartoon because I was tired of looking at her model's proportions. I then went into "Brightness / Contrast and raised the Contrast to 70 and lowered the brightness to turn her into something grotesque. I then used a less intense "Smudge" tool to soften the rest of the model's edges.

Friday, January 29

Three Recreations

Original Image


In my first recreation I edited in a new sky using the magic wand tool as well as the plane. I replaced a single green hue in the bushes with a bright cyan color. I also replaced an orange color in the building with a deep purple. I also decreased the brightness of the background image while heightening the contrast. At this point I felt the plane looked very out of place and decided to replace it's bright colors with neutral greens instead.

In my second recreation I once again started by editing in sky but using the other given image this time while still using the magic wand tool. I brought up both the brightness and contrast in the background image. I then replaced the color of light shadows by changing the hue and saturation to give the image a lighter-orange feel. I then edited in the plane using the magic wand tool again but this time made it much smaller and flipped the direction. I then replaced the colors on the plane to softer warm colors. I then replaced one of the bright greens in the bushes, greatly deepened its saturation, and increased lightness.
For my last recreation I edited in the first sky I used again, but I then turned it black and white. I edited in the plan again and added a rough pastel filter to it and replaced the colors once again to a cyan. I added Glowing Edges to the background image and set the fade to 57%. I then used the magic wand tool to only select the buildings and added the glass effect as well. I then went into color replace, selected one of the middle greens in the bushes and increased both the hue and saturation.

Friday, January 22

Photo Shop Day One

1. Resize to 5 x 7 jpeg
Here I simply went into "Image" and resized the given photo without problem with 72 pixels to make it web friendly.


2. Crop the Image
I decided to crop what I felt to be the most "active" part
of the given photo to try and give the
photo a more lively
and textured feeling.


3. Alter contrast
Here I changed the brightness to negative 150 and the contrast to 100% to make the once sunny setting into a sunset one.


4. Black and White
Here I created a black and white photo by using the black and white option and then changing the contrast to 100% for a more dramatic effect.


5. Stamp Tool

Although due to size it's difficult to see, I used the stamp tool to copy other part of the photo and effectively edit out the small blue boat in the background.


6. Be creative!
For the last photo I decided to combine skills. I first cropped the photo and then increased both the brightness and contrast. I then explored and found the photo filter tool and added a red haze over the photo. I'd like to think the effects give the photo a hot southern day feel.