Tuesday, July 12

Pete.com


Starting trolling one of the many "funny picture" websites out there. This one is called Pete.com and here a few of my found favorites just for kicks.

A Mechanical Dream


I have a friend from high school who by the end of senior year was getting quite into wielding. I got a sweet pair of earrings out of his beginning experiments. As he advanced his ides became more complex and I can only hope that one day he gets as good as

Pierre Matter

. Although this mighty whale boat is my favorite. I have a particular fondness of the use of asymmetry in many of these pieces and I feel they give the art a particular "gravitational" quality as though physics was present in the context as seen through the extended angles and movements that it brings.

Friday, July 8

Hilarious Posters from Hilarious People

Today on Stumble I found a site showcasing the most hilarious posters from the Rally to Restore Sanity hosted by my favorite television personalities Stephen Colbert and Jon Stewart. Although I was unable to attend the rally myself due to lack of funds, I watched the entire special as the rally took place. It was one of the most successful political rallies in decades including rallies against the war in Iraq and Afghanistan. I'm not sure if that makes me proud or upset only that I hope it becomes annual and I can go next year to make my final assessment in person.

If I had gone I probably would have made this sign too.

Thursday, July 7

Stumble Finds


This video reminded me of when I was young and my father would ask me what I wanted for dinner. Being an indecisive child I would always respond with the thoughtless "I don't know" to which he would respond- "Well then well have a rubber band sandwich and make it snappy!" At the time this made me think of tiny band members made of rubber being demolished by my father's hunger for puns- I enjoy this visual more although the nostalgia makes it sweeter.

Tuesday, July 5

New layout!

I went ahead and gave this page a long overdue overhaul before I start bringing all of my images onto the page. I am also considering keeping this solely as a semi-professional blog and creating a Deviant Art account for an online profile. In keeping with my new motivation to be professionally aware through the internet I've also set up a specified professional networking profile through LinkedIn as way to promote and reach out. Recently I have rediscovered StumbleUpon and consider it a valuable waste of time and invaluable resource for inspiration and have added my profiles link of the side bar of favorites. I have also added Fab! to the list as a new place of internet inspiration.

Sunday, April 10

Art from 2010-2011


Realized that I have not updated in quite some time and I should really start utilizing this blog more often to promote myself shamelessly. Since I have no motive to promote myself at the moment because I have no damn time for freelance work due to college, I'll just upload some of the things they have been keeping me busy with the past three years.

Drawing- Fall 2010- Crushed Paper Bag

I highly suggest this exercise for anyone who wishes to go out of there minds. :)


First project from my Illustration class

Chose to illustrate a "Hermit Rowboat"- see it?

Winter- 2011


A "mysterious" bathroom

Done in colored pastel pencils

Drawing I- 2010

Wednesday, May 5

Final Project for Photoshop


I decided to do the extra credit project and make the following photo into the younger looking version shown above. I started off by using the clone stamp tool as well as the patch tool to even out her skin tones and reduce wrinkles. I then used the brush as an overlay and brightened the colors of her hair and skin. After, I used the magnetic lasso tool to create sharper lines around the woman and pull the image onto a new canvas. I then used the liquefy filter to try and smooth out the image. I then used the smart blur filter to add a finished touch to her face. I used the Smudge tool for the smoother hair. To finish I used an overall blur to smooth outthe entire peice and added the color to the background.

Friday, April 23

Retouch Project


I started off this Retouching project by using the clone stamp tool, patch tool, and spot healing brush to decrease the amount of visible wear and tear to the original copy allowing the image to be free of creases. I then went into the brush tool, lowered the opacity, and selected the overlay option. I then selected my colors and added them to their appropriate place. I would change my opacity and color depending on the effect I wanted in particular areas such as the background that is actually an overlay of both a light yellow and bright yellow-green. I then used the crop tool to create a new edge. By changing the canvas size under "Edit" I was able to also create a new white boarder finishing it's more polished look.

Thursday, March 25

Assignment 6- Take Pics

Panoramic Photo:

I began by going out side and taking seven pictures, unloading them to the computer. I then opened Photo shop and by using "photo merge" I was able to blend my seven photos together. I then used the crop tool to create clean edges. I then used the "lasso" tool to select areas of the new photo that looked a little awkward and played with saturation and color balance to smooth things out. I then used the blur tool to blur the edges where the individual images merged.

Wednesday, March 10

Assignment 5- Scanning

1. I scanned the woman from a magazine ad and used the magnetic lasso tool to take her out of the original ad. I then pasted in the jungle background as a replacement. I then used the text tool to create an ad for PETA.
2. For the second ad I decided to change the background again and go with an ad promoting travel to visit the Mayan temple and ruins of Central America so I put a temple in the background.

Friday, February 5

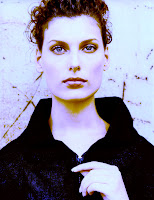
Assignment 3


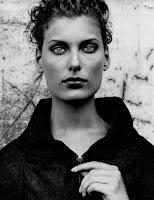
1. Black and White
I started off by creating an adjustment layer under the "Black and White" tab. I then brought the blue down to -53 and the red to -111 to create a dark and spooky effect.
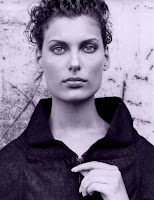


2. Black and White with Tint
I again brought up a Black and White adjustment layer. I brought the "yellow" down to a -9 and then added a tint. I changed the color of the tint to a pale lavender for a softer, entrancing look.
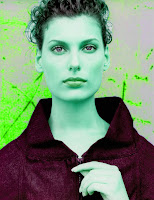


3. Model and Background- Different Colors
I used the Magnetic lasso tool to select the model and then used the eraser tool to refine the selection. I then, while the model is selected, created an adjustment layer for Hue/Saturation. I changed the hue to +116 which gave the model an outer-worldly cyan glow. I then inversed the selection to change the background. I changed the hue to +59 to get the lime green and also increased the lightness.
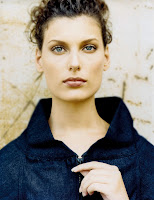


4. Gradient Blur- center sharp, edge blurred
To blur I just selected the Blur Tool, made the brush large, and hardness to only 4%. I continuously blurred the background and edges until the model really "popped".
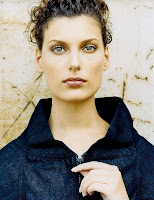


5. Sharpening
Under "Filters" and then "Sharpen" I used the Smart Sharpen tool and raised it to %150
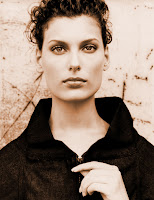


6. Old Looking Image
Started off by going into "Blur" under "Filter" and adding a Gaussian Blur. I then went back to "Filter" and "Add Noise" to about %40. I changed the blending mode under "Layers" to a "Soft Light". I went into "Hue/Saturation", clicked "Colorize", and then brought the hue up to a warm yellow-red and increased the saturation and lightness.
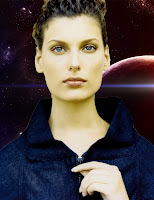


7. Change the Background
I began by using the Magnetic lasso tool to select the model, used the eraser to make it more refined, then inversed the selection. I then brought up by new background image in a new window and selected the whole background. I copied the selection and used "Fill" to fill the selection around the model. Finally I used the blur tool to try and soften the edges.
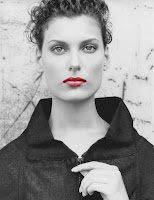


8. Choice
I selected the model's lips using the lasso tool and adding red-purple color to them by cutting out the selection, moving it to a different layer and then lowering the saturation on the original layer to -100 and the lightness up to +12. I then used the "Smudge" tool to soften the edges.


9. Choice
I went under the "Photo Filter" tab, added the "Underwater" filter, then raised the saturation. I then created a "Color Balance" layer, raised the levels of blue and magenta of the Highlights. Under shadows, I raised the levels of red and yellow to create a surreal effect.
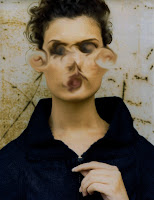


10. Choice
I used a size 25 "Smudge" brush to annihilate her face into a expressionism's cartoon because I was tired of looking at her model's proportions. I then went into "Brightness / Contrast and raised the Contrast to 70 and lowered the brightness to turn her into something grotesque. I then used a less intense "Smudge" tool to soften the rest of the model's edges.

Friday, January 29

Three Recreations

Original Image


In my first recreation I edited in a new sky using the magic wand tool as well as the plane. I replaced a single green hue in the bushes with a bright cyan color. I also replaced an orange color in the building with a deep purple. I also decreased the brightness of the background image while heightening the contrast. At this point I felt the plane looked very out of place and decided to replace it's bright colors with neutral greens instead.

In my second recreation I once again started by editing in sky but using the other given image this time while still using the magic wand tool. I brought up both the brightness and contrast in the background image. I then replaced the color of light shadows by changing the hue and saturation to give the image a lighter-orange feel. I then edited in the plane using the magic wand tool again but this time made it much smaller and flipped the direction. I then replaced the colors on the plane to softer warm colors. I then replaced one of the bright greens in the bushes, greatly deepened its saturation, and increased lightness.
For my last recreation I edited in the first sky I used again, but I then turned it black and white. I edited in the plan again and added a rough pastel filter to it and replaced the colors once again to a cyan. I added Glowing Edges to the background image and set the fade to 57%. I then used the magic wand tool to only select the buildings and added the glass effect as well. I then went into color replace, selected one of the middle greens in the bushes and increased both the hue and saturation.

Friday, January 22

Photo Shop Day One

1. Resize to 5 x 7 jpeg
Here I simply went into "Image" and resized the given photo without problem with 72 pixels to make it web friendly.


2. Crop the Image
I decided to crop what I felt to be the most "active" part
of the given photo to try and give the
photo a more lively
and textured feeling.


3. Alter contrast
Here I changed the brightness to negative 150 and the contrast to 100% to make the once sunny setting into a sunset one.


4. Black and White
Here I created a black and white photo by using the black and white option and then changing the contrast to 100% for a more dramatic effect.


5. Stamp Tool

Although due to size it's difficult to see, I used the stamp tool to copy other part of the photo and effectively edit out the small blue boat in the background.


6. Be creative!
For the last photo I decided to combine skills. I first cropped the photo and then increased both the brightness and contrast. I then explored and found the photo filter tool and added a red haze over the photo. I'd like to think the effects give the photo a hot southern day feel.

Thursday, May 7

Kacie_face Rants About Stuff

Here is a multimedia project I created solo about how silly MySpace, FaceBook, and Twitter are in my personal opinion. Honestly I see them more as a place for people to showboat themselves. The problem with this is that these are people that sound not be showboating anything. Taking pictures of yourself naked and putting them on your page does not make you awesome it makes you easy. Giving a site applications does not make it cool; it makes it cluttered. All in all, people are usually uninteresting and yet we have so many sites devoted to the cause of stalking them anyways.

Saturday, April 25

It's coming . . .

In the following week or so I will try to mange my own video to put up here. Since I am an opinionated person with alot of time on my hands I thought I'd make a short on my personal thoughts on the internet networking triforce: MySpace Facebook and Twitter. Just a little snippet or two with scrrenshot visuals added in. So watch closely for my personalized update to come!

Friday, April 17

Newspapers in Motion

Over the weekend I found two newpaper sites that offered video on the top 100 newspapers online in America. It would seem that all the top newspapers in America have a section right on their home page for multimedia and display the lastest in their archieve of video such as
The New York Times.

The NYT has a large library of news videos that are presentable and offer great sound quality. The section is easy to find and navigate since all you have to do is locate that 4x5 inch black video box.

Newspapers like Salt Lake City Tribune also offer a multimedia section on their home page. However, there is no lastest preveiw like in The New Yorker so the section is not zAlso, the multimedia consists of slideshows as well as video without the massive variety.

All in all it would seem any newspaper in the topp 100 of America has video on their site and manages the section with at least some amount craft; some just have more than others, and that's why their higher on the list!

Monday, April 13

iReport

The following videos are from iReport.com:
Video Game Factory Line:

This video I found very interesting as it talked about, roughly, how a game is made, at least down at MIT. The segment was particularly well done and certinaly telvision ready and worthy. If I was on CNN's dork news I'd put this up there. It takes a lot of time out of leveling up to go out and get those interveiws afterall!

Jazan Wild

This slide-show put on display the comic artwork of Jazan Wild. Recently released (2008), I found the artwork to be wonderfully done. After seeing this I really want to go and check out the series. Granted, this small bit of news might not be worthy enough to up on CNN but for anyone looking for a gruesome new comic book series, it's a sweet find.

Spiritual, but not Religious

Seeing as how Easter was this past Sunday, I decided to put up a video abut faith. Here is a woman on iReport that have many of the same values that I share as well as parts that got me thinking. I think that her video is very well written for the people in the "gray area", that is to say, people that appreciate religion but are not overzelous about it. Seeing as how CNN has taken other videos that broadcast one person's opinion- I believe that this one would been well worth considering. At the very least, maybe it will inspire you to put down the second or third chocolate bunny next year.

Thursday, April 2

Uranus


Current.com has some great news and links including this one: Uranus Apparel! This is an eco-friendly project to "help save the planet starting with uranus" and specialize in soy panties that I admit look pretty cute and comfy.

Sunday, March 22

You may be a dork if:


Here's a slide show illustrating my dork pride. All pictures shown are of things either I or my boyfriend own.